The guide below shows a way to convert
your DivX / XviD files to DVDs. I admit that these programs are not the best
way to do the job, just I believe it's the easiest one. So if you find the
TMPGEnc Plus / DVD Authoring program way too compicated, this guide will
let you convert your DivX and XviD files with just a few clicks.
The programs we are going to
use are Cucusoft AVI
to VCD DVD MPEG Converter Pro and MPEG
to DVD Burner. To get free trial versions of the programs, just click the two links before. The
first one converts your AVI files and the second ones creates the DVD files
and burns the disc. Note that you will not get menu and all kind of fancy
stuff, but the job will be done fast and easy.
The new versions of these programs have some very important changes. First, the AVI to VCD DVD MPEG Converter GUI is much improved and changed, so the new guide was essential. It's encoder is much improved too, as it is much more stable than before and faster as well. The MPEG to DVD Burner has also a lot of bugs fixed, as well as support for new DVD burners.
![]()
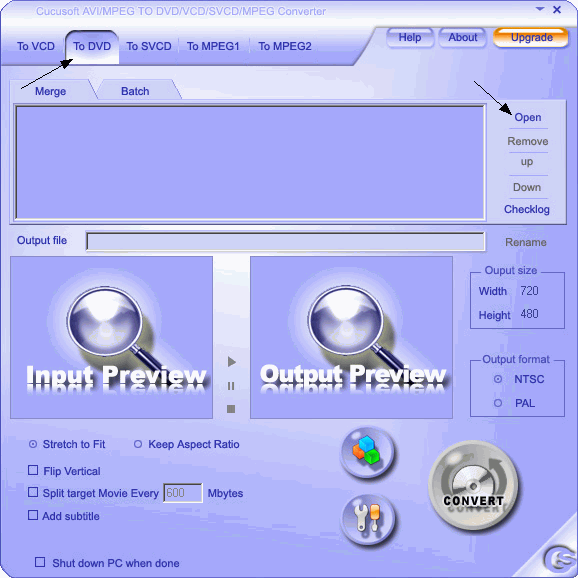 |
Obviously the program you are going to use first is AVI To VCD DVD MPEG Converter Pro. First of all you select the conversion you want to do. We want to convert our AVI file to DVD, so select AVI To DVD. Now you have to select between two tabs. Merge/Join will join all the video you add (as you can add more than one) to one MPG file. Batch will encode each AVI to a different MPG file (so that you burn it in more DVDs). As you understand if the videos are small select Merge, if it's big movies you want to put into different DVDs select Batch. If you are only encoding one video, then anything should be OK, so leave it to Merge. Now it's time to add a video file, so click Open to load the video files you want to convert. |
![]()
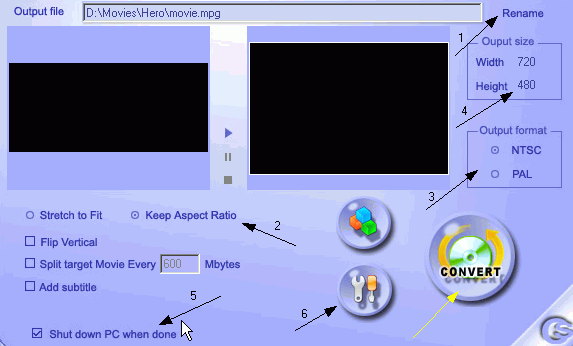 |
Now it's time for the output settings. First of all select the location and the name of the output file (1). Then select Keep Aspect Ratio (2) to maintain the original aspect ratio of the video file you are encoding. After that select the output format (3) between PAL and NTSC depending on your source file. (most DVD players play both formats, so by encoding a DVD with the same video system as the source file you avoid many errors like audio/video synchronisation). The PAL and NTSC selections will set the right output size (resolution) (4). Also if you want your PC to shut down after the conversion (usefull as the conversion may take some time) select option (5). Option (6) opens some advanced settings, where you can select between Variable bitrate (better quality) and Constant bitrate ( not so good quality but lower proccessing time). When you're done with all the settings, click CONVERT. |
![]()
 |
This is the window that will show you the progress of the encoding. Depending on the video's length and your settings this will take from 2 to 5 hours. Wait for it to finish and after it does, close AVI To DVD, open MPEG To DVD Burner and proceed to the next step. |
![]()
 |
First of all load the MPEG file we encoded in the previous steps (1) in MPEG To DVD Burner. |
![]()
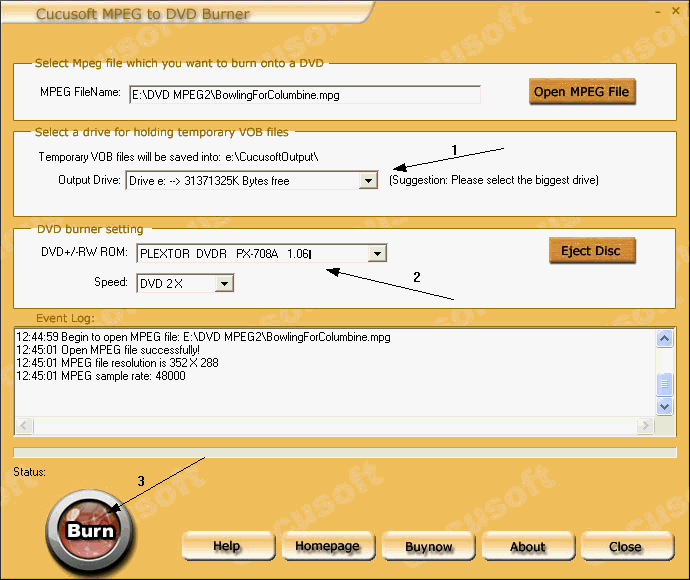 |
There are some more settings before you burn. Select the drive you are going to put the temponary files into (1) and then select your DVD burner and the burn speed (3). After this you should be OK. Click Burn (3) and the program will create DVD files and burn them to DVD. Here you go! In just 5 steps you converted your DivX / XviD file to DVD! |
Click here if you want to download trial versions of AVI to VCD DVD MPEG Converter Pro and MPEG to DVD Burner.
If you want to buy the tools you can do it by clicking here for AVI to VCD DVD MPEG Converter Pro and here for MPEG to DVD Burner. These links will bring you to RegNow's order page, from where you can safely pay and download the products.