Modern mobile phones have more and more features. They include cameras, games, mp3 players, radio receivers and of course, video players. However the files you already have in your computer are not playable in your mobile phone right away. To help you achieve that this guide exists! We will use the freeware tool SUPER, probably the best free video converter available. You can download it from our site here. (you need to be registered and logged in)
Keep in mind that as the phone's technology advances, they support more and more codecs and better quality video playback than before. So in this guide we have included two images that show the most appropriate settings, one for older phones and one for the newest models.
![]()
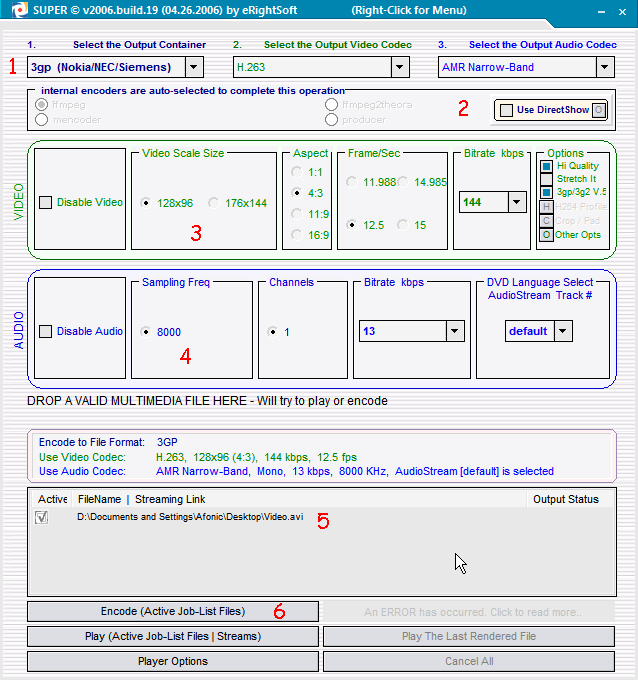 |
Next comes the DirectShow (2) option which will let you use any video playable from Windows Media Player in SUPER. We suggest you enable it and only you have trouble set it off. What follows are the video settings (3). Here you must know your phone's resolution and select the setting closer to its native one (you should be able to find this resolution in the manual or in the manufacturer's website). After you decide what resolution to use, set the aspect ratio and set the frame rate to 12.5 or 15. The bigger the better, but if you see what your phone has trouble playing back the files you made try lower values. Finally set the bitrate somewhere between 128 and 240. The bigger, the nicer in terms of quality, but you also get a larger file, so if you are short in memory you may want to use a low value. Our next stop are the audio settings (4). Not much to do here, if you have a hands free set a higher bitrate than what we have selected in the image so that the audio quality is higher. In area (5) you can put the videos you want to be converted. You can drag-and-drop them inside or right-click and select "Add Multimedia Files". We will explain some more settings of the right-click menu in Step 3. If you have one of the latest models that include phones like Nokia N Series and Nokia 6270/6280 read Step 2 to find out how to use the best settings for them. If not, ignore the next step and proceed to Step 3. |
![]()
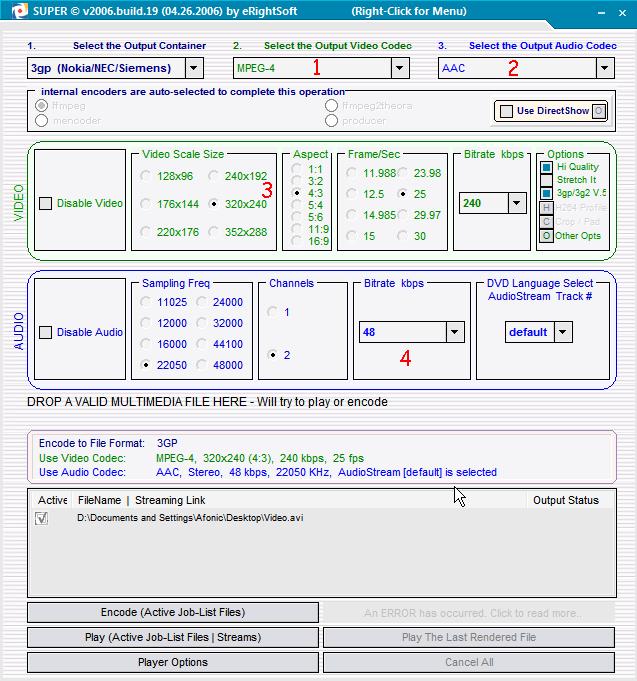 |
Let us remind you once again that this steps contains the different settings a user that owns one of the latest mobile phones should use in order to create higher quality videos. First of all the container you should use is still the 3gp one. Some phones support .mp4 files but it is actually the same thing so you better keep the 3gp setting so that you are sure everything works as it should. Next in line comes the video codec (1) that you should set to MPEG-4. Afterwards set the audio codec (2) to AAC. Now lets move down to the video settings (3). In the resolution setting you should select the one that is the native resolution for your mobile phone's screen. For example for a Nokia 6280 that has a 320x240 value we set the same value in SUPER. In the frame rate and aspect ratio use the same one as source video. (you can get these info about the source video if you double-click on it while it is in the list). Finally in the bitrate box set something between 192 and 432. As we already said before, the bigger bitrate the better in terms of quality but also the file gets larger. Finally, in the audio settings (4), a bitrate between 48 and 96 is enough depending on your choice about the video quality. |
![]()
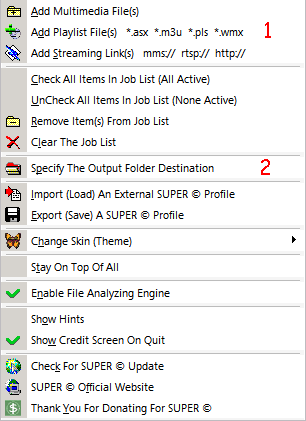 |
A setting you should set before you encode is "Specify The Output Folder Destination" (2), and select the directory in your hard disk that you want SUPER to put the files it will encode in. The rest of the settings are pretty obvious, as an advice you can disable "Show Hints" and "Show Credit Screen On Quit" after you are familiar with the program. And that because the helpful hints become kind of disturbing after a while! :-) Also make sure you keep "Enable File Analyzing Engine" on. Finally you are ready to encode! Click the encode button [(6) on the image in the first step] and after a while you will have a file perfectly playable in your mobile phone! Afterwards just move it over to your phone and enjoy! If you have trouble playing it back on your device you may want to tweak the settings a bit or come in our forums and ask for help! |