Staxrip is certainly one of the best converting programs I have used, and it is among the tools I recommend to users for ripping a DVD. Of course it can also handle Blu-ray discs and it excels at this process too, giving you full control over your rip while still featuring a simple interface. In this article we will use Staxrip in order to rip a Blu-ray disc to an MKV file keeping the original DTS-HD audio. As you will see through the steps of this guide, you can also rip your Blu-ray in a rather large number of formats and containers supported by Staxrip.
You can download Staxrip directly from our downloads database using the link below. You will also need Avisynth installed so if you don't have it, grab it from here.
Step 1
As Staxrip cannot unlock a protected Blu-ray disc (almost all movies are protected), before you begin you need to use an unlocking software to circumvent the Blu-ray's protection. I really suggest you let AnyDVD HD do that job. You can download it here or check the authors page here.
Step 2
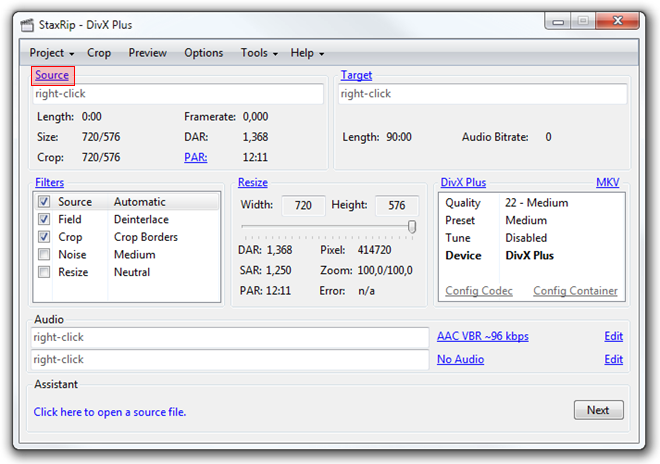
Open up Staxrip and select Source in order to load our Blu-ray.
Step 3
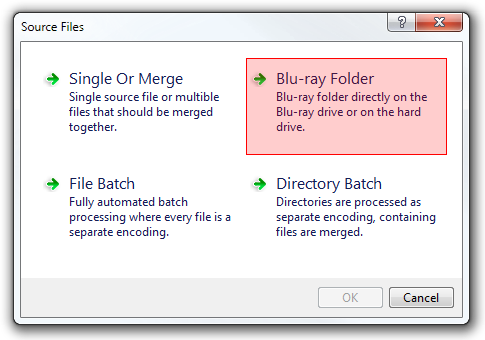
At the window that will popup select Blu-Ray Folder.
Step 4
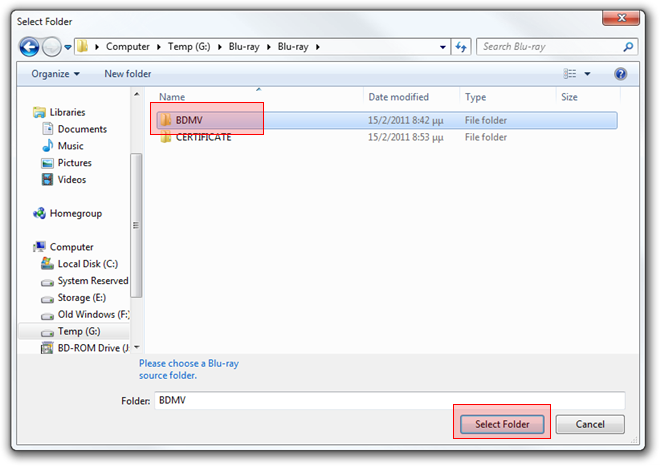
Open your Blu-ray drive, or the folder you have ripped your move in, and select the BDMV folder.
Step 5
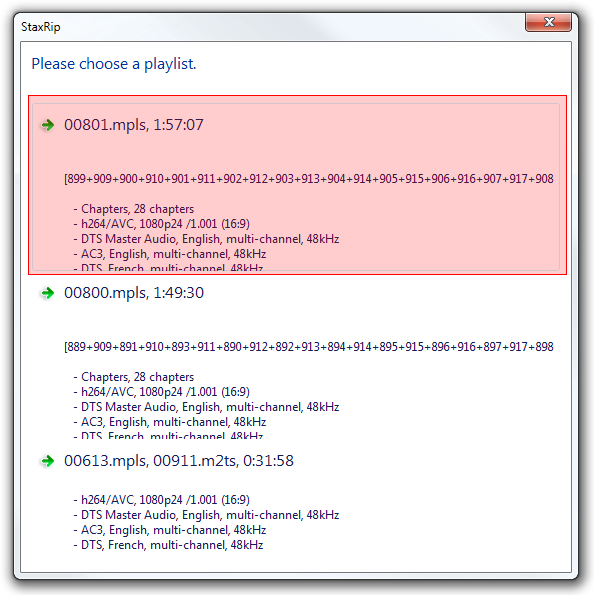
Staxrip will check your Blu-ray and give you the various playlists. The movie is the biggest one, so click on it to continue. In this example, our Blu-ray uses seamless branching, in plain words it has a "Director's Cut" feature and that's why there are two playlists with about the same length. We will still use the largest.
Step 6
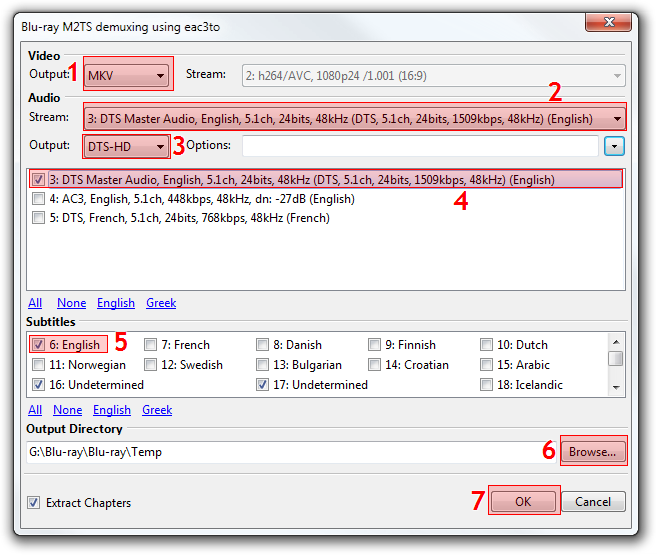
Here you can select the various demux options. Leave output to MKV (1). Select the audio stream you want to use (2), and set the output to DTS-HD (3) or if you have TrueHD audio to THD. You can read detailed information about the various Blu-Ray audio formats here. Now make sure your audio stream is also selected in the list below (4) as the first two values set the demux options and the later the tracks we want to keep. Next, select the subtitles (5) you want to extract, set the output directory (6) in which the temp files will be saved (make sure you have at least 30GB free space there) and click OK (7). Staxrip will now demux your Blu-ray disc and create separate files for video, audio and subtitles streams. This process will take from 30 to 90 minutes depending on length of the movie and the speed of your Blu-ray drive.
Step 7
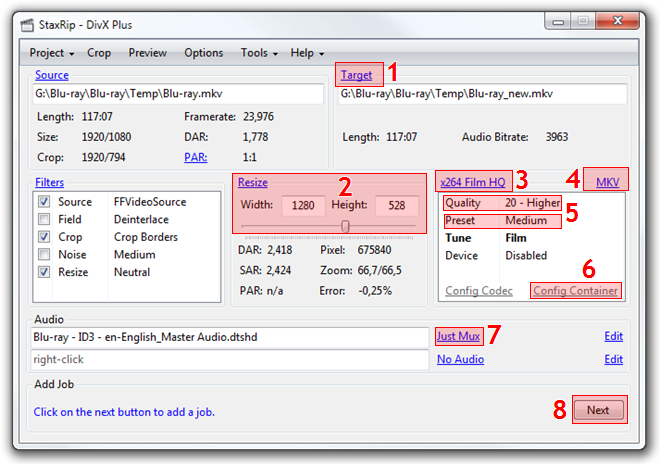
After demuxing is complete the main Staxrip window will open again. First of all, set the Target (1), which is the output file. Now lets explain the rest of the options. The Filters area will be usually automatically altered to add the filters that you may need, just make sure to unselect Deinterlace as we don't need it. Crop is applied automatically 99% of the time in order to remove the black bars. Using the slider in Resize (2) you can downsize to 720p as I have done here, otherwise just leave it at 1080p.
By clicking the x264 Film HQ (3) title you can set the codec and the encoding method. In this example I have selected x264, tuned for film and using constant quality. Constant quality is a faster encoding method than the traditional 2-pass option and as the name implies, tries to keep a constant quality on all your files. That however means that you cannot know how big the file will be as it depends on the movie length, the CQ setting and the actual content. Usual values range from 18 to 26, with 18 being the "best" and 26 the "worse" quality. I am using this option for my mkv backups as I prefer to base my encoding on video quality and not file size. Of course, you can also select 2-pass in which case a Target size option will appear in the Target box in order to set the desired size.
Next select the MKV Container (4) and set the Quality and Preset settings (5). I already explained the quality setting, the preset one basically lets you select between encoding speed and video quality. Medium or Slow are the recommended values. You only need Config Container (6) in order to add subtitles, we will explain who at the next step. Moving to the audio preferences, as we want to keep the original DTS-HD track we will select Just mux (7). Of course you can select AC3 and let Staxrip convert your audio. If you don't need subtitles click Next (8) and move to Step 9, otherwise click Config container and move to the next step.
Step 8
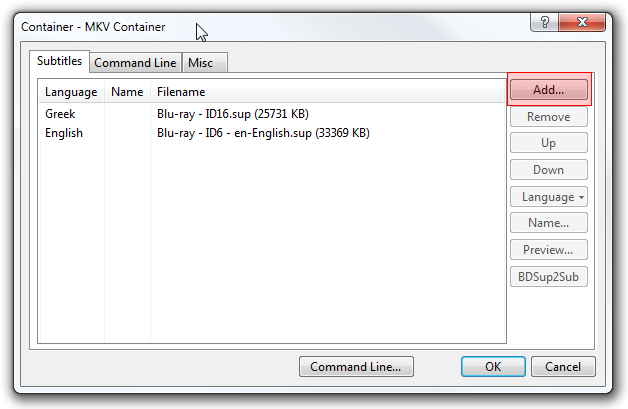
In the Container options you can add subtitles to your MKV. During the demux process Staxrip will use BDSup2Sub and convert your .sup Blu-ray subtitles to .sub format. So you can use either use .sup subtitles or the .sub subtitles Staxrip prepared for you for maximum compatibility. They will all be in your project folder. Be aware that if you want to use the sup subtitles but you have resized your video to 720p you have to load BDSup2Sub and manually resize them too or they will look way too big. Click OK to save the subtitle settings.
Step 9
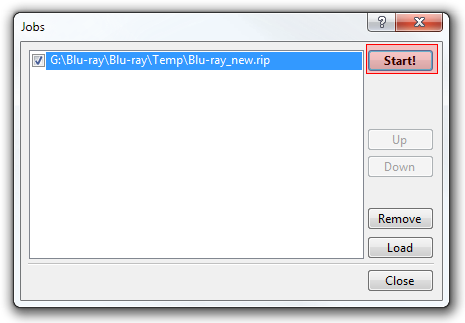
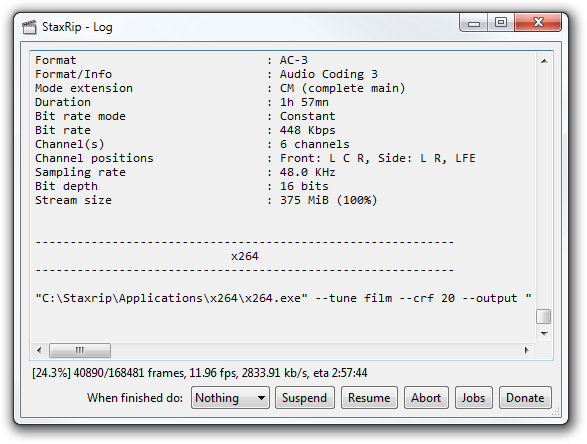
To start the encoding process click Next in the main window (number 8 at step 7) and then click Start.
Step 10
That's all! A few hours later you will have a high quality MKV file. As always you can use the comments form below or the forums in case you have any questions or problems.
Comments
VLC should work fine and passthrough the DTS-HD audio correctly.
I for one really appreciate what you have done here and understand Staxrip 10x better now than before I'd gone thru' your help.
Great stuff!
Thanks
SW
Please Advise