The 3.2 version of DVD Shrink introduced many new features, enough to make the need for a new guide essential. In this guide we are going to see how to copy a DVD using DVD Shrink and the new features and settings.
For those that do not know what DVD Shrink is: it is an application that can copy DVDs, and especially fit full DVD9 discs into cheaper DVD5 media (shrink them!). It is freeware, it includes many advanced quality features and also a CSS ripper, which means you can copy protected discs. You can download it here. Install and start reading this guide! You can also get AnyDVD as many new titles will fail because of newer protection mechanisms. Just use AnyDVD in the background and you're done. Click here to download.
Unfortunately DVD Shrink development has ceased for a couple of years now. Many new DVDs contain protections that it cannot unlock. In case you have trouble you should try ripping the DVD first with a decent program, like DVDFab HD Decrypter (freeware) or use the excellent DVDFab DVD Copy for the full process.

 |
When you first start DVD Shrink you need to load the DVD. The Open Disc button will open a DVD disc you have in your DVD reader drive, the Open Files button will load DVD files you have in a folder in your hard disk. We are going to use Open Disc for now. |

|
|
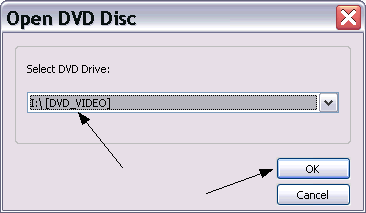
Things are pretty simple here. You just have to select the drive you have the DVD in and then click OK. Then DVD Shrink will unlock and analyse the DVD before you continue. If you have trouble loading the DVD here, try to play the disc for 30secs with your DVD playback software and then try loading again. |

 |
|
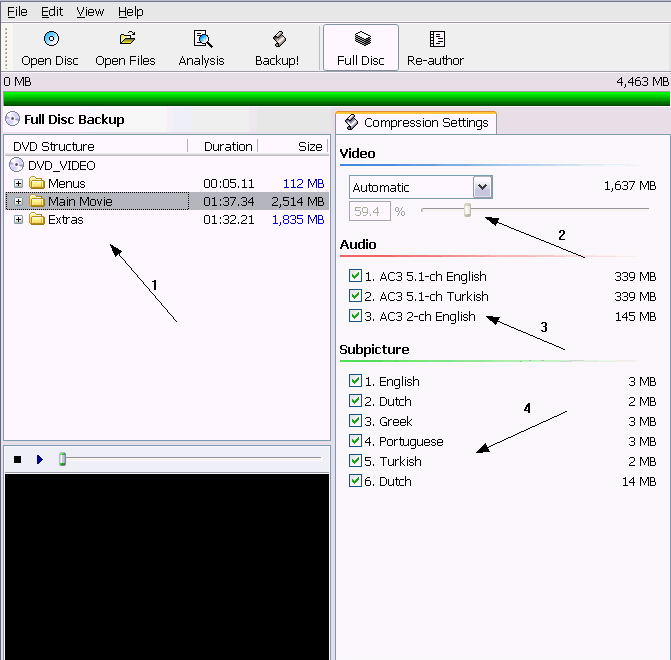
This is the screen you'll see after DVD Shrink has loaded the DVD.
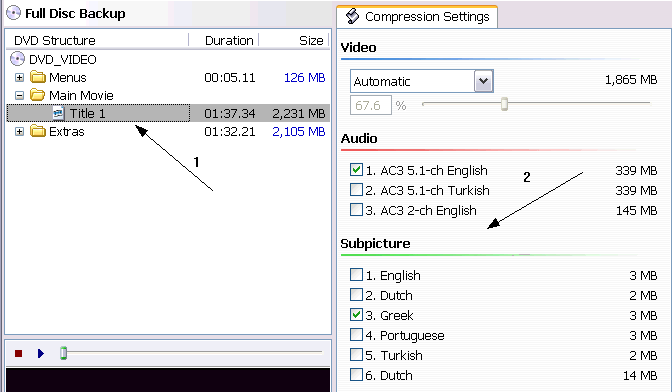
(1) These are the contents of the DVD by category. If you select the category you can edit all it's content as I have done here. I you want to change the settings for each video track seperately you can click on the + sign and select each one of them. When you select one track or category you can change the settings in the right, that we are going to explain right now.
(2) Here you can select the compression. The bigger the % number is, the better quality you'll get. The options here are Automatic, that selects the right compression to fit the DVD automatically, Custom Ratio, which lets you select the compression you want (usually used in the extras to lower the quality and gain a little bit in the movie). Keep in mind that you need to have a look at the green bar you can see in the top and make sure that your project fits into a single DVD. Over options are Still Image, which replaces the video with an image and you use it when you want to remove that video track and Still Pictures, which replaces the video with compressed pictures from the movie taken evey few seconds (pretty useless, unless you want to keep the audio).
(3) Here you can select the audio tracks you want to keep. Be careful as some tracks may be director's comments, view the DVD to make sure what is what and make the right selection.
(4) Here select what subtitles you want to keep. Even if they seem small, they take some space, so keep the ones you really need.
Let see an example.
|

 |
For example here I have selected the main movie track. (1) The compression is set to Automatic (2) and I have just selected one audio track and one subpicture stream. Note because of the removal of 2 audio tracks and 5 subtitle streams the quality of the main movie has raised from 59,4% it was in the picture before to 67.6% now. |

|
Let's demonstrate some things you can do with DVD Shrink before we show how to start encoding!
|
 |
|
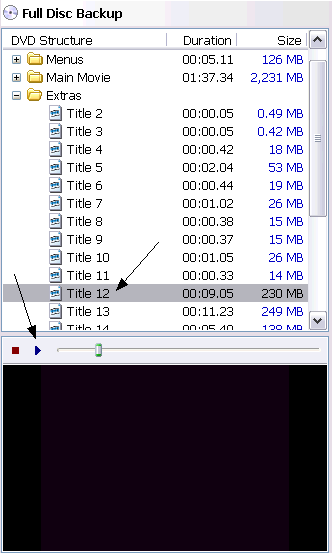
When you're unsure about which tracks to keep and which not you can use DVD Shrink's preview feature. Just select the track you want and then click Play in the preview area. You can now watch the track and decide weather to keep it or not!
|
 |
|
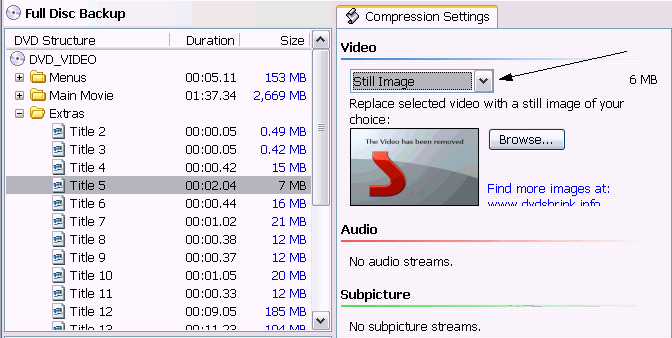
Every track you don't want to keep, you can just replace it with a still image. Removing it doesn't exist because that would change the DVD structure. But you don't have to worry. Just select the track you want to remove (all the whole extras category if you want to remove all extras), then select Still image in the video compression drop-down menu and that's it! You can even select your own image to use by click the Browse button!
|
 |
Finally if you want to keep the extras it would be a good idea to reduce their quality (do the same with the menus) so that the main movie - which is the thing you should always give your attention - has better quality. To do that just select the category (menu or extras or both of them) and in the video drop-down menu select Custom Ratio. Then move the slider to the left in order to decrease quality. Make sure you have set the main movie's setting to automatic so that it increases quality automatically when you lower the over parts of the disc. Also make sure the bar in the top is green - a red edge means that you are over the limit, while a grey one means you are not using all the available space.
When you have done all the settings, it's time to encode our movie. |

 |
|
To bring up the backup options screens you just need to click the Backup! button in the toolbar in the top of DVD Shrink window.
|
 |
|
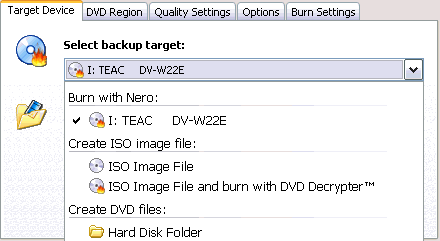
First options screen is the Target Device one. Here you just select what to do with the DVD files DVD Shrink will create. The first option is to burn the files with Nero (you must have it installed). If you have CopyToDVD installed this option will appear also. Also you can create an ISO file and, if you want, burn it afterwards with DVD Decrypter. Be careful because this does not mean you can burn just with DVD Decypter as you need Nero installed again to create the ISO file. Finally you can just output the files in a hard disk folder and then decide how to burn them.
The "Select folder for temponary files option" above the back-up target one (hidden by the menu here) is the location that DVD Shrink will put the DVD files before burning them. Make sure the hard disk you select has enough free space and that you remember where they are as you have to delete them manually after the burn.
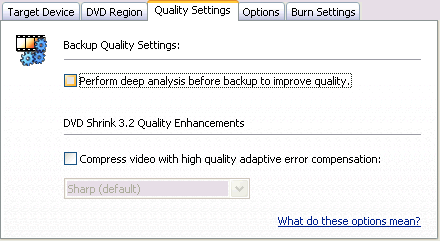
We are not going to go through the DVD Region tab, as you just leave everything to default (just select Region Free and leave Provider ID empty). Now you are ready to click the Quality settings tab.
|
 |
|
Here the things are pretty simple. If you want the encoding to take the less possible speed leave these two options unselected. This will increase the speed. In the other hand if you want to have the best possible quality you should enable both of them, but be ready for a long encoding time. If you click the "What do these options mean?" link in that window you can read more about these options in DVD Shrink's help. For your convenience I have uploaded this document and you can read it here.
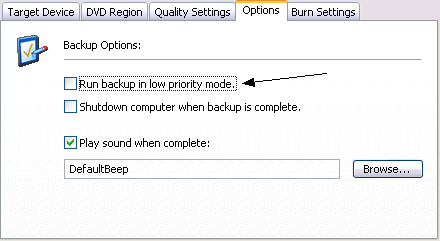
Now click the Options tab.
|
 |
|
Here select "Run backup in low priority mode" if you want to use your PC while DVD Shrink will encode. If not (I suggest you leave it alone!) then deselect it. The other two options are obvious so make your selections and then click the Burn Settings tab.
|
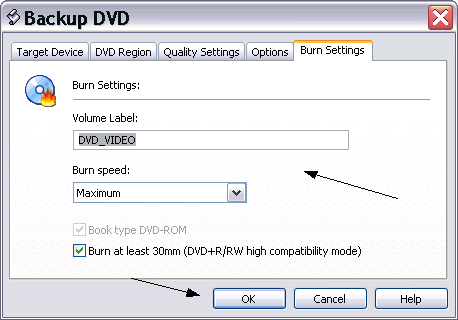 |
Here just type the label you want your DVD disc to have and select a burn speed (Maximum is fine usually). Then click OK and the encoding begins! |

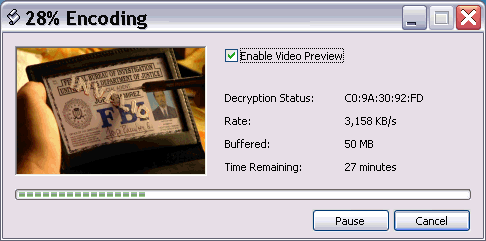 |
After that the encoding will begin. Depending on your PC and the settings you have selected it should take from 30mins to 2hours. After that, depending on your option a new window will come up to burn the DVD or create the ISO image.
You now think you are a DVD Shrink master don't you? Not yet! You have successfully made a backup but lets have a look at another useful small thing! |

|
The little thing you need to know about is re-author mode. Let's have a look.
|
 |
|
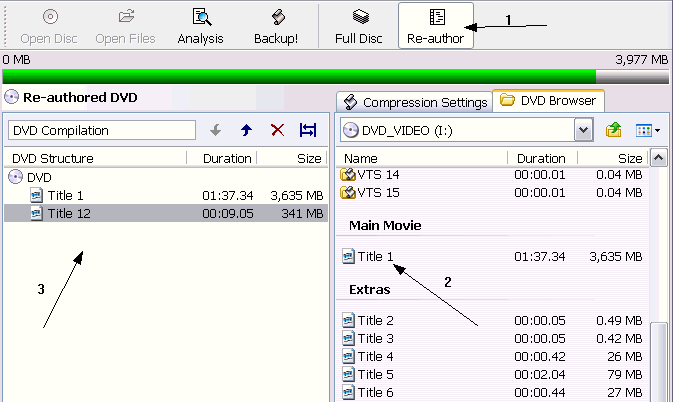
To enable re-author mode click the button in the toolbar (1). What this mode does is pretty simple. It authors the DVD again so that you just keep only what you need. When you press the button the screen changes like the picture above. From the DVD Browser (2) you can drag-and-drop the tracks you want to keep in the Re-authored DVD area in the left (3).
Here's the point that needs some more explaination. You can add whatever you want, BUT the menus will NOT work. Which means that you'll see the menu animations like a video and you won't be able to make any selections. So you understand that you should not add the menus.Without the menus though, there is no easy way to see the extras (you need to use your standalone's controls to move between the tracks, not being able to see which track is what).
So you easily understand that the re-author mode is meant to be used when you want to keep just the main movie. Actually re-author is the best way to copy big films like Lord Of The Rings and others over 3 hours. When you want to keep the menus and some extras use the guide as we showed above. When you just want to keep the main movie, use re-author!
Well after this huge guide I hope you are a DVD Shrink master! If you face some problem don't worry, just come over to our forums and ask - we'll be glad to help!
Happy dvdshrinking!
|