The new DivX 5.1.1 is probably the best release of the version 5 of the DivX codec. Fast and easy, has loads of new features that can make your video look better in the same size!
Please follow the instructions exactly as shown here. A small change at the settings can have a big effect at your video. Always use the programs you can download from here, as different versions may not work right.
![]()
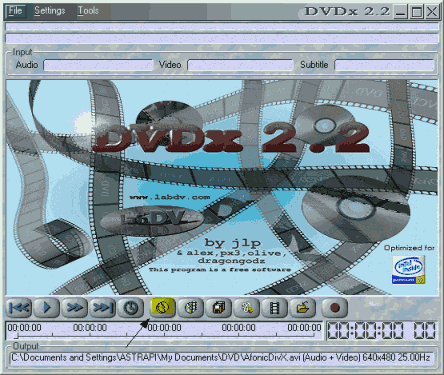 |
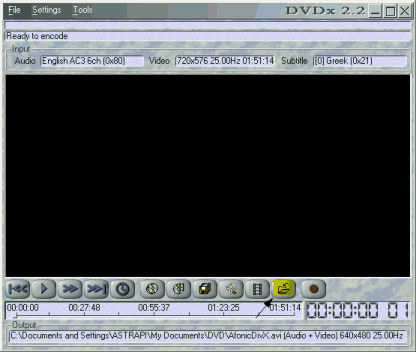
We start the same as the 4.12 guide. This is DVDx 2.2, a very nice and free program. First click at the highlighted icon to select the source of the video wo want to encode. |
![]()
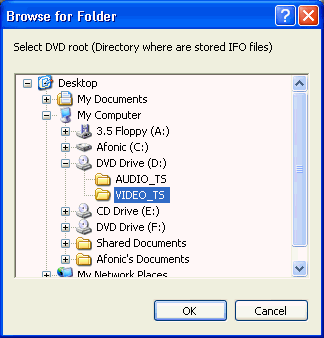 |
Now we select the VIDEO_TS folder of the DVD we want to rip. Sometimes DVDx does this automatically for us so we proceed to next step. |
![]()
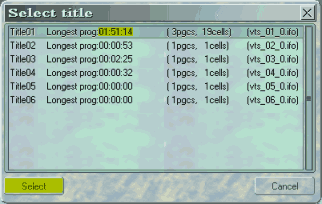 |
Here you have to select the Title which has the BIGGEST length. In our situation it is Title01. Highlight it and then click select. Don't worry about the other ones, they are just intros or ads of the movie. |
![]()
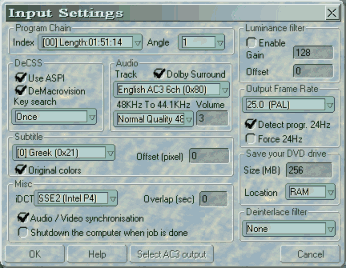 |
After we select the right Title this window comes up. Make sure Angle is set to 1. Check Use ASPI and DeMacrovision. At Key Search once must be OK, if you encounter problems you can try Each VOB ID or Each VOB/CELL ID. At subtitle select none for no subtitle or select the language your want. At Audio select Doldy Surround and select the track you want. At Output Frame Rate select the right values for PAL and NTSC. Also check Force 24Hz if your DVD is NTSC. At Misc select the Audio / Video synchronisation and select Shutdown the computer when job is done if you want the computer to automatically shutdown after the encoding. In iDCT use SSE2 if you have a P4, otherwise use FPU. At Save your DVD drive select a big value at the Size, as the ripping takes long and that's not good for your DVD. If you have 512MB of RAM select 256MB at the RAM. If You have 256, 128MB at the RAM. If you have even less select 256MB at the Hard disk. At Deinterlace filter leave None and then click OK. |
![]()
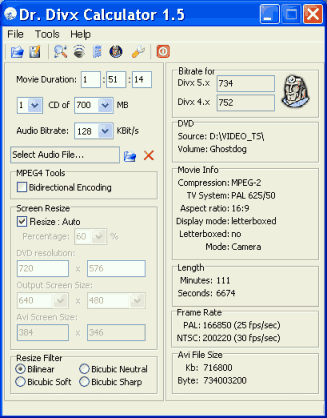 |
A new tool for this step of the guide. Dr. DivX calculator is the tool we should use here. Before starting it insert the DVD in your drive and the calculator will automatically recognise the disc and add all the info. All you have to do is to write down the value at Bitrate for next to DivX 5.x and also round the value DOWN. In this example it's 734 so we'll use 730. |
![]()
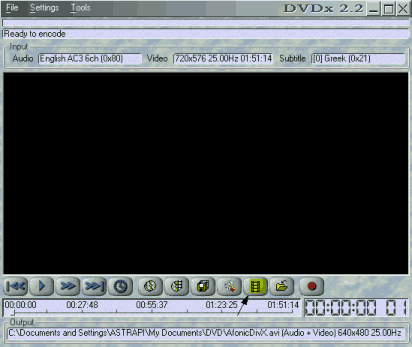 |
Back to DVDx now. Click at the icon that is highlighted. |
![]()
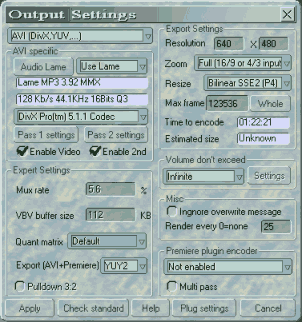 |
In this one just fill in all the values as you see them here. Make sure you select the DivX codex and that you enable 2nd Pass, as well as Use Lame. At Zoom select None or Full. At resize select Bilinear SEE2 for P4 or BiCubic SSE/3DNow. Be sure to click at Whole button. At Volume don't exceed select Infinite as DVDx can't create two files if 2-pass is enabled. For two CDs movie read this guide to chop the AVI file in two after encoding. Now click at Audio Lame. |
![]()
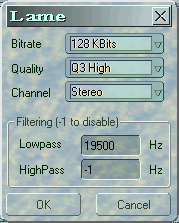 |
Here select the values shown here. Click OK and you will back at the window in Step 7. Now click Pass 1 settings. |
![]()
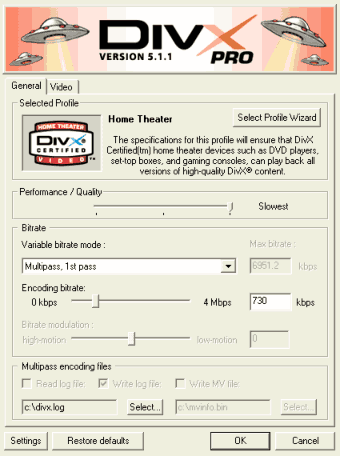 |
OK, here is some new stuff. Select Home Theater as a profile and then Multipass, 1st pass at Variable bitrate mode. Then at Encoding bitrate select the value you wrote down before (here 730). Also Click Settings and select the option Disable Feedback window (not shown here).Then click at the Video tab. Note: The Performance / Quality option does what it says. Using the option here will provide the best result, but will take much more time. Maybe Standard value will fit you better. |
![]()
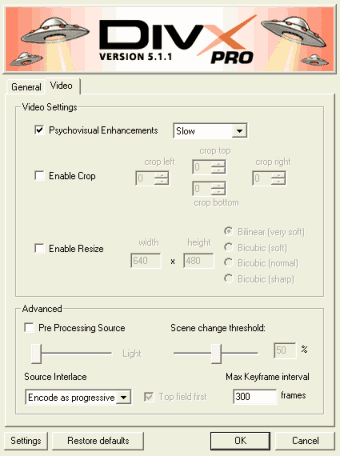 |
Use the same settings and then click OK. You are back to the picture of Step 7. Select Pass 2 settings. |
![]()
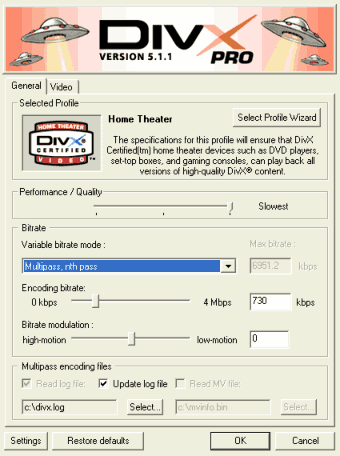 |
Here are the settings for the second pass. Leave the same bitrate and select Multipass, nth pass at Variable bitrate mode. You don't need to alter anything at the Video tab. Click OK. |
![]()
 |
Back to known stuff. Now select the highlighted button to select the target file. |
![]()
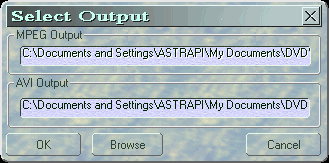 |
Here click Browse and select the folder and the filename of your file and then OK. |
![]()
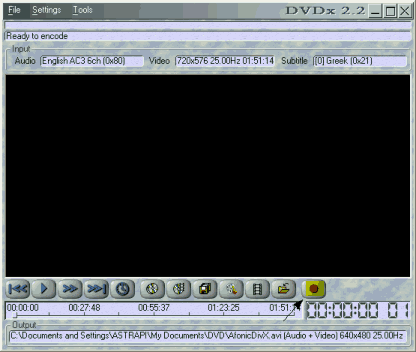 |
Now click the rec button. Wait for 10 minutes and watch the progress. If you see horizontal lines in the video stop the encoding and go back to Step 4 and then select Interpolate at the Deinterlace filter option. After the encoding finishes you can burn the avi file in a CD using the common ISO/Data option. |
NOTE: At the middle of the process (at 50%) a window will come up saying "Releasing the AVI file, please wait and do not kill the application". Please do so! It can take from 10 to 40 minutes to continue so please wait. it may seam that it;s not working but it does!


Comments
email [email protected]