A lot of people are making VCD/SVCD/DIVX movies because they fit onto smaller media. In my opinion this is very senseless for a few of reasons.
Processing time: It
can take up to 3 hours to convert a complete DVD title into a VCD, even longer
for the better formats. High quality Tmpeg conversions can take 12 hours!
Quality: Unless you use SVCD or higher
resolution mpegs, the picture quality is horrible.
Size: A VCD takes approximately 2
CDR's. SVCD takes up to 4 CDR's. DivX can vary.
Compatibility: Many tabletop players
will not accept SVCD or DivX. Few will accept non-standard
VCD.
I'm going to show you another easy method of breaking down a DVD into two CDR's,
while preserving high quality, compatibility, and saving time! I'm going to
show you this process with pretty pictures so you don't get lost. We're also
going to do this with one easy-to-use FREEWARE program! You will need the following:
DVD Shrink. It's freeware, it's awesome, and it has everything we need built
right into it. With a few tricks we can decrypt, split, and compress a single
DVD into two CDR's, within about 2 hours! Download DVD Shrink here.
First let's take a look at the facts. The best quality you're going to get is with a standard DVD. The best compatibility you're going to get is with a DVD. So why, oh why would you want to use anything else? We will be compressing the movie so some quality will be lost, but for the love of god, believe me when I say it will be no worse than SVCD can offer. I have used VCD/SVCD and I have given up on them after a great deal of good and bad experiences. Don't waste your time, just read on....
![]()
 |
Put the DVD disc
into the drive and load up DVD Shrink, give it a few moments for the
computer to recognize the disc. Hit the OPEN DISK button. |
![]()
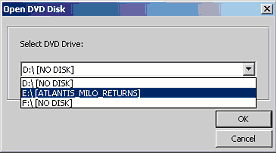 |
A window will popup and request the drive where the DVD resides. It should look like this.3) When you select the drive and hit OK, the disc will be analyzed. This will take a couple of minutes. If the ENABLE PREVIEW is checked, you will see a fast forwarded preview of the movie. |
![]()
 |
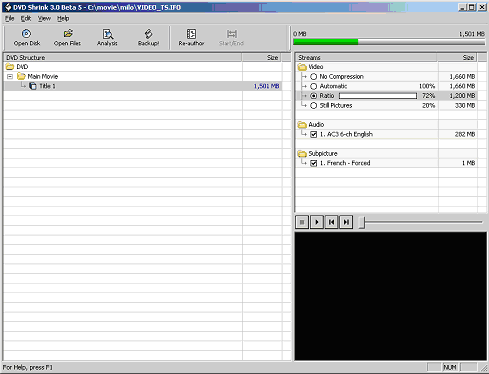
After the analyzing
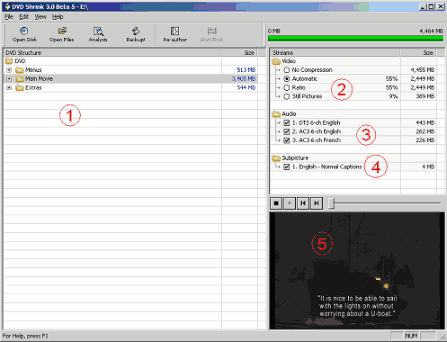
is complete, the main window will display the following. I’ve labeled the screen capture. The DVD Structure window is labeled as 1. This area shows the contents of the DVD. We see the menus, main movie and extras. The contents will vary for each DVD but will all be similar. On the left you see the STREAMS window marked 2, 3, & 4. It contains the video, audio and subtitle streams for each item in the DVD structure. If you highlight a different structure item, the streams will change, showing only the streams for that item. We are only concerned with the main movie. Highlight it and notice the streams window. |
Label 2 shows the video stream. DVD Shrink version 3 has an automatic compression feature. It will automatically set the compression to the level needed to fit the entire DVD onto a blank. If you were to check the RATIO option, you can manually slide the compression level back and forth by dragging your mouse over the slide bar that will appear. Still pictures are something you will never want. Label 3 shows the audio streams for the main movie. It shows various languages and sound types. Only one of them is required and we will go into more detail about that later. Label 4 shows the subtitles available for the movie. They are small and you may leave them all if you wish but I normally deselect them all. Label 5 shows a preview of the structure highlighted. If you select the main movie, it will start playing the main movie. If you select the menus they will be previewed. Note that there is no sound. This is normal. The preview window is a video preview only. Don’t be alarmed when you hear no sound. We need to rip this DVD but only the main movie. To do this we must use RE-AUTHOR mode.Click the Re-auhor button you can see in DVD Shrink's toolbar right at the top. |
![]()
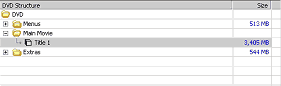 |
. If you click RE-AUTHOR at the top a new instance of DVD Shrink will open. Now highlight the main movie and hit the plus (+) next to it. It will expand showing you the actual main movie and size. It looks something like this.We are going to drag this highlighted part from this instance of DVD Shrink into the empty DVD Structure of the other. Adjust windows on the desktop to accomplish this. |
![]()
 |
Now we work in
the new window. We now need to remove some of the unwanted stuff from
this new DVD and compress it to maximum. - Select RATIO in the video stream. A slide bar now appears. Slight the blue all the way to the left as far as you can. The ratio percentage will decrease as you do. - Uncheck all of the audio streams except for the one which matches your language. Normally there are 6-channel and 2-channel sound formats. Chose which of them you want. - Uncheck the subtitles if you wish. If you don’t keep audio of a language, then do not keep the subtitles for that language either. Personally, I don’t keep anything. Notice how my settings are adjusted in this display. |
As you adjust everything the green bar at the top will movie. This bar indicates how much space is required to make this DVD. By default it is set to fit on a blank DVD. A blank DVD is NOT 4.7 gig, it’s actually smaller. You can select any customizable size from the EDIT/PREFENCES menu at the top. If you see red on the bar, it’s too big. You will also be notified of this fact when you try to backup. You shouldn’t see this though because the maximum compression ratio will get the size below a standard DVD 99.99% of the time. I our example we see 1897MB. This is good. We will now back this up to the hard drive. Click BACKUP at the top. You should see the next window popup. |
![]()
 |
Enter the directory
where you will be placing the files. Make sure you have enough room on
your hard drive. If region free is not selected, check it. The Deep Analysis is a feature that performs a check on each frame of video instead of at intervals. This promotes quality. I normally do not use this on the first pass. I will however use this on any addition compression passes because the compression will get heavier and effect quality. The time required to rip this DVD will increase significantly if you do a deep analysis. I recommend you do not use this on the first pass. Leave provider ID as it is. Hit the OK when ready. DVD Shrink will now rip the movie. The time that it will take depends on the computer and drive speed of your system. I’ve noticed that it does get faster as it moves through the process. The time will be adjusted as it goes. |
| There is the possibility of an error here. If you get a cyclic redundancy error during this process it may be caused by a few things. First the disc may be scratched or dirty, clean it. Next try another DVD reader because not all drives are equal and some have problems with certain discs. Finally if you cannot get it to work, you must rip the DVD to the hard drive using a freeware program called DVD Decrypter. It has the ability to fast skip over errors. Return to DVD Shrink after you rip it to the hard drive. If all else fails, get another disc. You can download DVD Decrypter here and read a guide here. |
![]()
 |
Once the ripping
is complete all of the DVD files should now be in the folder you selected.
They will be completely decrypted and compressed to fit a standard blank
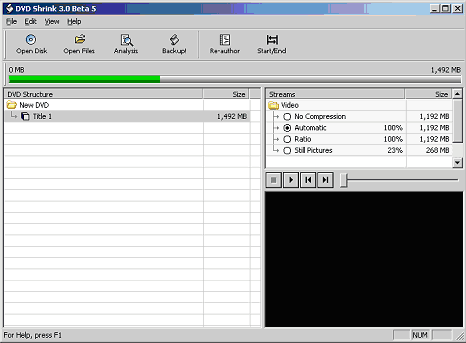
DVD-R. The main DVD Shrink program should still be running, if not, re-run it. We are now going to select OPEN FILES at the top. Find the directory where you ripped the DVD to and select the VIDEO_TS.IFO file. Click OK. The files will be analyzed and loaded in DVD Shrink. This time we will repeat the compression. Select RATIO and slide it all the way to the left until total size is 1400MB or less. In this example, we do not get it under 1400MB. That’s okay. It’s close enough so that when we split the movie into two parts, we can compress each part and each should get under 700MB. |
This will allow us to fit it onto a CDR. In the following display we can get it to 1501MB. That means after we compress this, it will be close enough to start splitting. If it was much larger, we would either re-compress again or decide to split this into 3 CDR’s. 3 CDR’s would require us to be under 2100MB. In which case we would stop here and skip to the splitting part. I hope you’re catching on. We are going to hit BACKUP again and dump these files into a different folder. We want to keep the entire folder separate so we can take a step back if something goes wrong or if we decide to use more than two CDR’s. I suggest you use DEEP ANALYSIS this time and every time you compress it after the first. Again we let it recompress and go through the process. Deep analysis will cause it to take longer but it’s really needed now. Hit OK and the software will start ripping. You should not get any errors now that all the data is being read from the hard drive. |
![]()
 |
Now that the rip
is complete again, let’s re-open those files using the OPEN FILES
button again. To split the movie we have to use the RE-AUTHOR mode again. Click RE-AUTHOR and drag the main movie into the new DVD Shrink instance. You’ll notice that the START/END button is now available, as the display at your left shows. 1Click the START/END button and you will see the following window popup. |
![]()
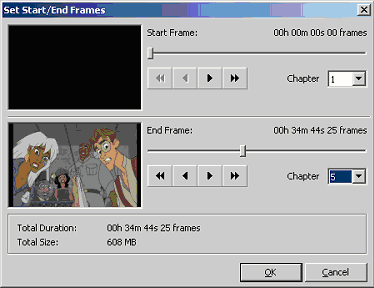 |
This allows you
to cut the movie by setting a start and end point. The compression and
ripping will ONLY occur on the part designated. The trick here is to
find the absolute middle of the movie and make sure that both parts are
under 700MB each. I normally start at chapter one of course and then
end at the middle chapter. Usually this will be right about the middle
but in some cases it will not.
The other method is to use the slide bars and write down where the first half ended so that you know where the second half will begin. Also consider cutting the movie before the ending credits to save room. The two preview windows will show you where you are in the movie.
|
|
![]()
After I have created each part,
I will go on to burning the miniDVD’s. I use Nero Ultra Edition 6.
Simply select miniDVD and the VIDEO_TS and AUDIO_TS folders will be created
automatically. Dump all of the files into the VIDEO_TS folder, NOT the root
directory! Of course each half on its own disc. Follow the instructions for
your burning software.
IMPORTANT NOTES
Some DVD players, especially older ones, have a problem decoding these movies. I’m not sure why but I’m assuming it’s the level of compression. You should burn the discs at a maximum speed of 8X to be absolutely safe. Also use DISC-AT-ONCE mode.
If your player is 5 years old and it has a problem with these, there’s not much else I can say but to buy a new DVD player. I have a cheap Apex 1200. They don’t last long but they’re under $40 a piece and play almost anything I put it them. Buying a $200 player is foolish unless you’re positive that it’s good quality and compatible with various video formats.
Is it worth it?
These are DVD compatible discs that you have made. They should be compatible with any modern DVD player. Also the quality will be better than an SVCD as long as you did not compress it 10 times. There are three reasons why I claim that these are better. First DVD format uses a VBR or variable bit rate for video. SVCD uses a CBR or constant bit rate. The rate on a DVD is as high as 9800 kbps. A standard SVCD is below 2600 kbps. Also the resolution for a DVD is approximately 720x480, where as a standard SVCD is 480x480. More resolution means you get a better picture as long as the video rate is high enough. Last but not least, I’ve tested these and compared them. My method has produced movies that are nearly DVD quality. When I’ve compared them to SVCD’s of the same movie, the SVCD loses every time.
Copyright (this guide & pictures) © 2004 stmdk
Comments