XviD is a codec that is getting more and more popular in the video community, especially after DivX became commercial. Of course that was not the only reason, as in the latest versions quality and speed have improved very much, so that we can now say that XviD is not only as good as DivX is, but even better than it. In this guide we will use DVDx for encoding, and the Koepi build of the codec, which seems to be the most popular and you can find here. Let's go!
![]()
 |
Load DVDx. The first thing we are going to do is load the DVD. The first icon in the picture opens the DVD and the second opens an IFO file you have stored in the hard disk. Select open of them and load your DVD! |
![]()
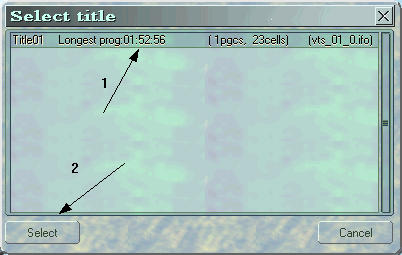 |
In this window select the Title you want (there might be more than one, find the one that contains the movie by checking the length). (1). Click Select to continue. (2) |
![]()
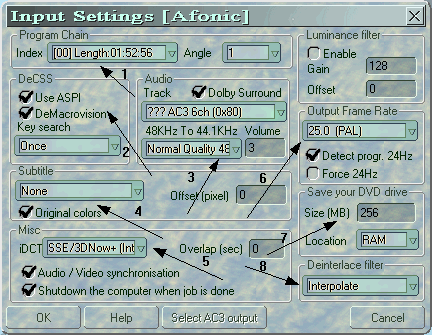 |
Dazzed and confused? No need as we are going to explain everything here! First of all make sure the index has the right selection (1). Then select Use ASPI and DeMacrovision (2). After this it's time for the audio settings. Use normal quality at the 48 to 44.1 KHz conversion and select the right sound track (3). Select Dolby Surround. Finally increase the volume by putting a value like 5-6 if you think it's low. After that select the right subtitle in field (4) or select None. At Misc, use the right value for your CPU, or FPU for best quality (but lower speed). Select Audio/Video synchronisation. The other option is obvious what it does! |
|
![]()
 |
Now we have to set the output settings. Click this button in the DVDx toolbar. |
![]()
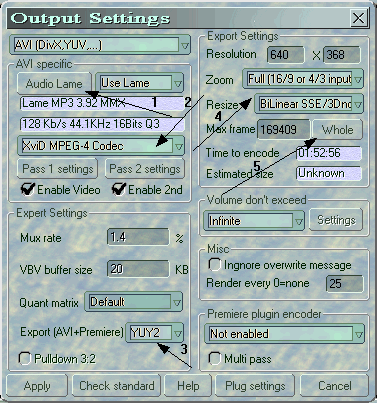 |
First of all make sure that AVI is selected in the top left corner of the screen. Then click Audio Lame (1) and select 128kbps for audio (of course you can select another value if you want). From the drop-down list (2) select the XviD codec and enable the 2nd pass. In Export (3) select YUY2. Now in the Export Settings use a resolution of 640x368 for a 16:9 movie and 640x480 for 4:3 movies. At Zoom select Full and at Resize BiLinear or BiCubic making sure that it's right for your processor. Finally make sure you click the Whole Button (5). Now we are going to set the codec's settings. Click Pass 1 Settings button. |
![]()
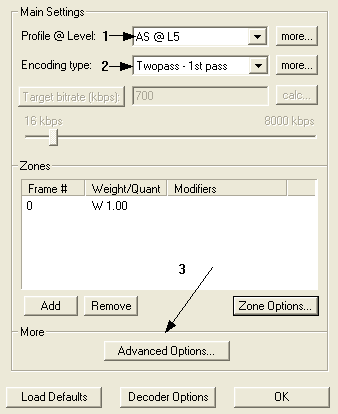 |
Here we are. Select the Profile you see here (1) and also Twopass - 1st pass in the encoding type (2). Now we are going to set some more settings. Click the more... button next to the Profile menu (1) and have a look below for the right settings! |
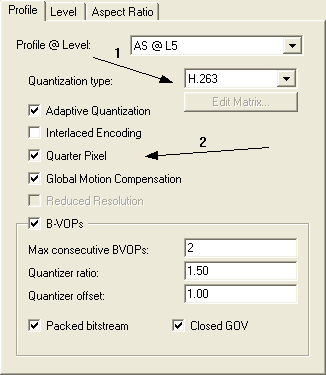 |
Here select H.263 in Quantization type (1). Now in the rest settings (2), these are the ones I use. I suggest you use Adaptive Quantization and Global Motion but try Quarter Pixel's effect by creating a small video and decide if you want to use it. As you can see, I am using it. Click OK and close this window and then click Advanced options in the window we saw in the picture above (3). |
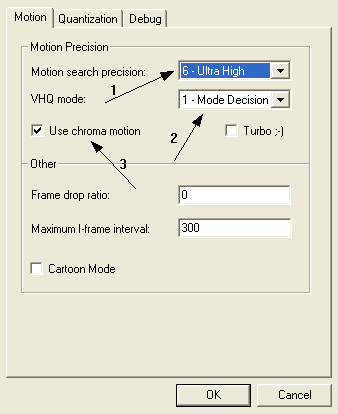 |
In this screen select Ultra High in (1) and Mode Decision in (2). A higher value in (2) will create better quality but it will also take much more time, so I do not suggest it. Also select Chroma motion (3). Click OK and close this window and then again OK to close the codec settings window. You are back in DVDx's output settings now. Click Pass 2 Settings. |
![]()
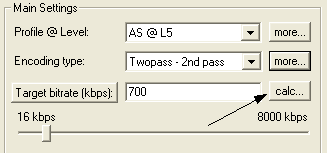 |
Leave all the other settings the same, just select Twopass - 2nd pass in the encoding type menu. Now click calc next to Target Bitrate (if you Target Size there click on it and it will change to Target bitrate). |
![]()
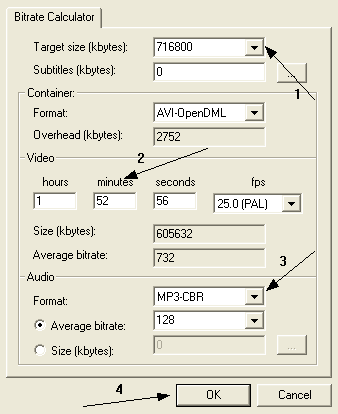 |
Allright in this one first of all make sure the size is the one I show, which is the right one for a 700MB CD (1). Then enter the exact movie length (2) and select the right Mp3 bitrate we set at step 5 (3). Have a look at the average bitrate and click OK. Now in the target bitare box you should see the value that the calc caclulated. If it doesn't work (usually it works OK), enter it manually. Click OK to close the codec settings and Apply to close DVDx's output settings window. |
![]()
 |
Finally click the
Folder button to set the output filename and folder and after you do
that click the red rec button to start the encoding. Wait a few hours and you'll have a premium quality XviD file! |


Comments
at the "Output-Setting s" make sure that you have in the
"Pass 1 Settings" --> Encoding type: "Twopass - 1st pass"
NOT
"Twopass 2nd pass". This is the setup-config for the "Pass 2 Settings"!!
After this is correct, you can run the RIP-Process
Have fun!
Why does the subtitle show up on the TV and will not go away when pressing the subtitle button on the remote?
Thanks!
my aim is z400boyatvking if someone can help