Of course not only Linux matured but the applications that run on the platform did as well. I remember I used to boot my Windows partition almost only to use video tools, like ConvertXToDVD or Nero as I couldn't find a working choice on Linux. However this is no longer the case. There are many great video applications for Linux, some of them even better than commercial ones for Windows, all of them not just free but open source as well! This guide is the first one in a series of guides we will add about Linux video programs. The program we will use is ManDVD, a frontend for many command line tools. Let me tell you beforehand that this program is simply amazing. The amount of the tasks it can achieve is enormous, the GUI is simple and the control you have over the DVD you are creating is almost perfect.
{mostip image=info}You can download ManDVD for various Linux distributions from here. It needs quite a few programs and depends in many KDE libs so downloading a deb or rpm is preferred over compiling the source. For your information I am running Ubuntu in the PC I used for the guide.

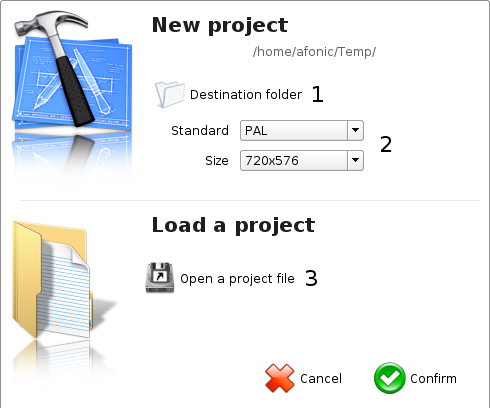 |
When you open ManDVD you will see this screen. Here you should first of all set the Destination folder (1). Make sure it has at least 5GB of free space. Then you should select between PAL and NTSC and set the resolution (better use the default 720 one) (2) or open a saved project file (3). Finally click Confirm to start using the program. |

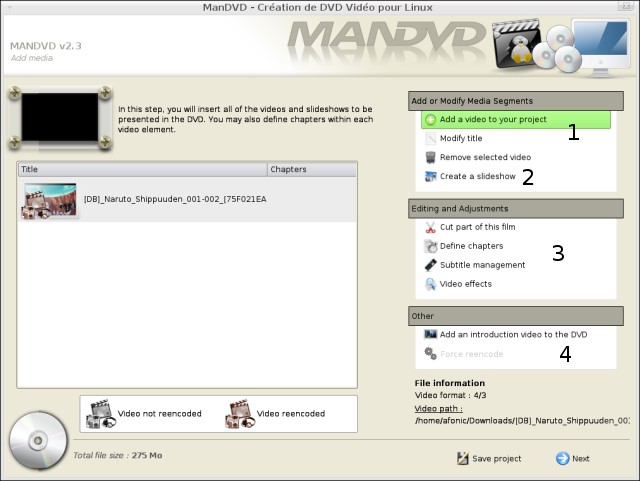 |
This is the main manDVD window. The first step is to add your files. Obviously selecting "Add a video to your project" (1) will allow you to select a file to add to the DVD. The Add file dialog is explained below. Looking at the other options (2) - "Modify title" changes the video's title for the menu and "Remove selected video" removes it from the project. The "Create a slide show" is an amazing option that lets you add a slide show in the DVD among your videos. It will be further explained in a future guide. Then we have the editing options (3). "Cut a part of this film" is pretty obvious that allows you to cut parts that you don't want from the file, "Define chapters" sets the chapters of the video (this is where the DVD player stops when you press "Next" in your controller), and "Subtitle management" allows you to add external subtitles to your film. Finally there is the "Video effects" option which allows you to apply some interesting effects like Delogo (remove a logo from a certain area of the video - for example a TV station logo from the corner) or denoise (that could improve video quality). You can also change the brightness of your video if you find it to be bad. In the Other (4) section you can add an introduction video that will play before the menu and "Force reencode" of MPEG videos that ManDVD may think that are already DVD ready but generate problems. When you are done with adding all your video you can click Next. See below for an explanation of the add file dialog before moving to the next step. |
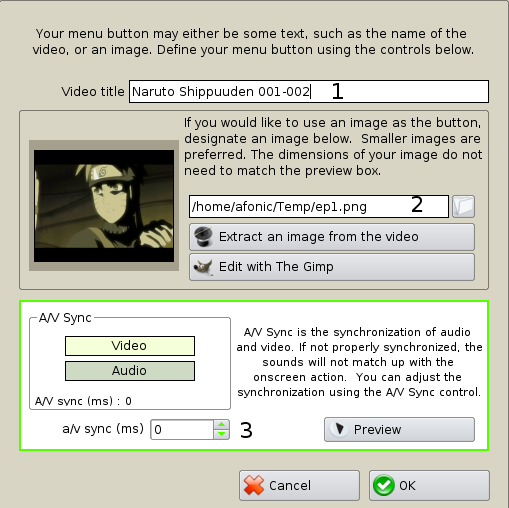 |
This is the dialog you will see after selecting which file to add. First of all you should set a title (1) for this video. This title will show within ManDVD but in the DVD menu as well. Another cool option is the ability to add a button to the menu using an image from the video. (2) To do so select "Extract an image from the video". A small media player will start playing your video. Click the camera icon you can see in the bottom right corner when you find the image you want. Then it will be saved and loaded here as the button for that video. You can also "Edit with The Gimp" - if The Gimp is installed of course - in case you need to add some effects to it or put some text in there to make your menu look better. Finally before clicking OK and adding the video you can add some delay to the video or the audio in case they don't match (3) (usually you won't have to use that option at all). |

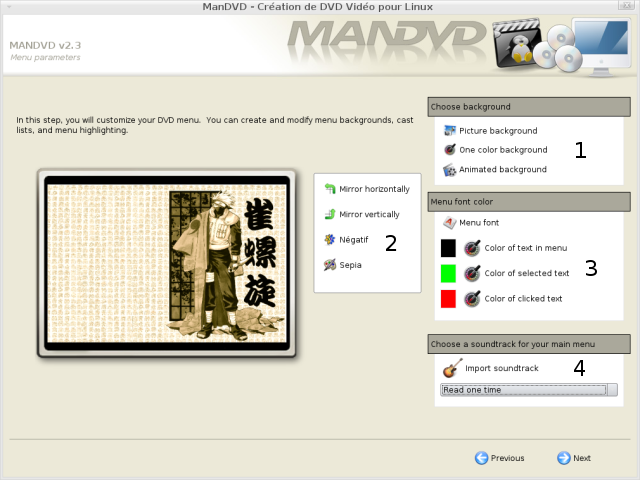 |
In this step you can customize the DVD menu. Your first choice is the background (1). You can either add a picture, just a color or a video for an animated background. From my experienced a nice background image makes a good menu as adding a video makes it too messy while a simple color makes it look too poor. After adding an image you can change some simple settings (2) like rotating it or changing the colors. Next stop is the font settings (3). Here you can choose which font to use, its size as well as the color of the text by default, when selected and when clicked. Finally you can add a song as a background (4) and select if it will play once or loop for ever. When you are done with... pimping your menu click Next and go to Step 4. |

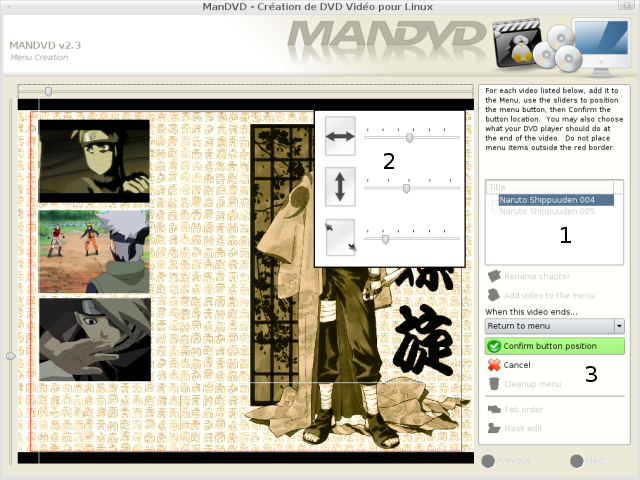 |
Next comes the button placement. First you need to double click on the video you want to add to the menu (1). Note that if you generated an image button in Step 2 that image will appear, if not just a text with the title of the video. Next you should set the size of the button using the sliders (2) as well as its place using the other two sliders on the top and left side. When you are done placing your button select "Confirm button position" (3). Each video in your project must have a menu entry, and then you can click Next and move to the next step. |

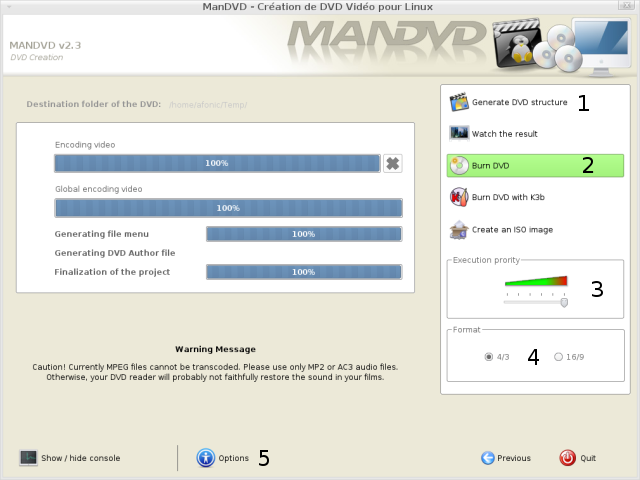 |
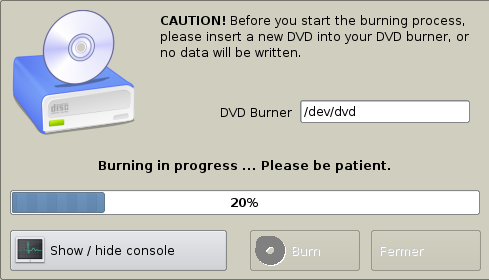
You are finally able to create your video. First of all you can set the Execution priority (3). Set it to full if you plan not to use the PC or just do light tasks, lower it if you want to use the PC normally (it takes more time though). Next select the video format (4) between 4/3 and 16/9. You may also want to have a look at the Options (5) even though the defaults work fine. The options window is explained below. Now you can encode your video by selecting "Generate DVD structure" (1). This can take from a few minutes to a few hours depending on the length of your DVD and the speed of your computer. {mostip image=info}Keep in mind that when you have a 64bit CPU, using an AMD64 distro can give you a huge performance gain. As I have both 32bit and 64bit versions of Ubuntu installed and an AMD Athlon64 X2 4200+ I did a small benchmark, encoding the same project (about 90 minutes of XviD) in both environments. The i386 platform took one hour and 5 minutes while in AMD64 I was finished in 40 minutes. Quite a huge difference if you encode videos often don't you think? After the DVD is created you have a few extra options (2). First of all you should "Watch the result" to make sure everything is OK. Afterwards you can burn using ManDVD, move your project to burn it with K3b (if it is installed of course) or create an ISO image to burn later. Burning right away works fine so the rest options are there just to give you a choice, for example K3b offer much more options than ManDVD itself in burning. In the screen below I am burning my DVD using ManDVD: |
 |
| Finally here is the options window: |
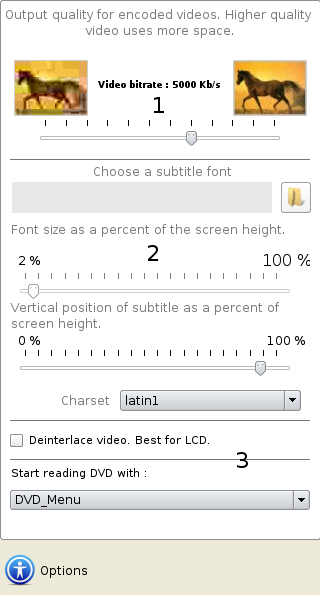 |
These are some options you can change before encoding, most importantly the video bitrate. (1). 5000kb/s is a good default setting. Change it only if you want to fit more video than 2+ hours on the DVD. Next your can select some options for the subtitles (2). Something that you may need if you are using special characters in your subtitles is to change the charset to utf8 (for example for Greek or Kyrilic letters). Finally you can select if you want to deinterlace the video (use it if you see horizontal lines in the encoded video - in 99% of the cases you shouldn't need it though) and if the DVD player will display the menu or start playing the first video when the disc is loaded. |
I hope that after reading the guide you feel as excited as I was when I first tried ManDVD. In case you need any help please use our new Linux forum to ask, just remember to add your distro info as well as the console output that you can see when you click "Show/hide console" when converting. Stay tuned for more Linux guides!
Comments
I'll test it!
Thanks.
Does ManDVD convert Divx, Xvid, and/or MPEG4 video files with ac3 audio?
cleared up a couple of things for me
you select the destination folder in the first step, choosing where to send the temp files. And yes, ManDVD converts .avi files into DVD.