Search

Login

FairUse Wizard 2 is one of the most popular DVD rip programs because of its load of features and the simple wizard-like scheme it follows. However as most options are not really clear to the users we have been asked for a guides many times, so here it is! This guide will show you how to convert a DVD to XviD or the new H264 codec. Easily as you will see, one can add convert to any other codec as long as they are installed in his system.

You can download the Limited Edition (has an 700MB output file limit, missing iPod support and some more features) here. You can buy the full version at the official site of the program which is located here.
Note that as FairUse Wizard is an open source program you may find various other full version builds which are however not supported by the author and may contain malware.

Step1

Fairuse01


This is the first screen you will see when you open FairUse Wizard 2. So first of all you need to create a new project. Set the name of your project (1) and then select a folder in your hard to see that FairUse will rip the DVD into (2). As both the DVD and the output file will be put there there should be more than 6-7GB free in that hard disk. Then click Next (3) to go to the next step.

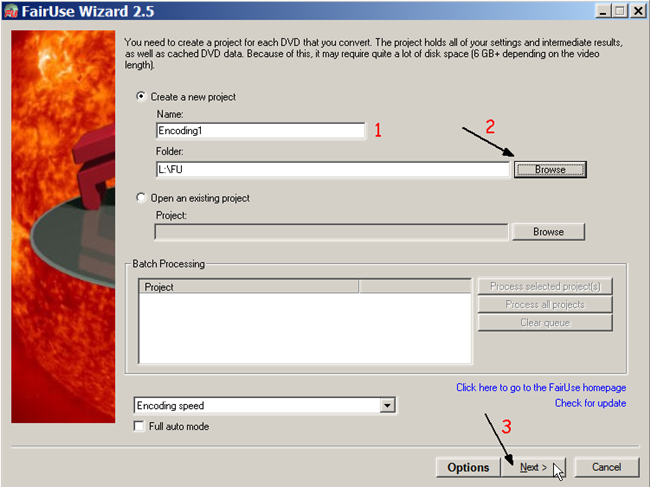
The Options button (next to Next) will take you to an options screen which is not really needed unless you want to enable expert options (use external codecs, change format from .avi to .mkv) so we will not cover it here. However there is an option to change the language in there so you may want to change it if you are not familiar with English/


Step2

Fairuse 2


Then you will be asked to select the drive that contains the DVD you want to convert (1). You can also select an ISO file already in your hard disk. When you're done click OK (2).

As FairUse Wizard 2 cannot copy protected discs you have to pass the protection almost all commercial DVDs have another way. The easiest way is to download and install AnyDVD. It sits in the tray and does all the work! (this works not only with FairUse but any program that does not support protected DVDs). The other way is to read our guide about how to extract a DVD to an ISO file using DVD Decrypter (follow it up to Step 3). Note that you will need double the hard disk space and some extra time, but this method is free.


Step3

Fairuse3

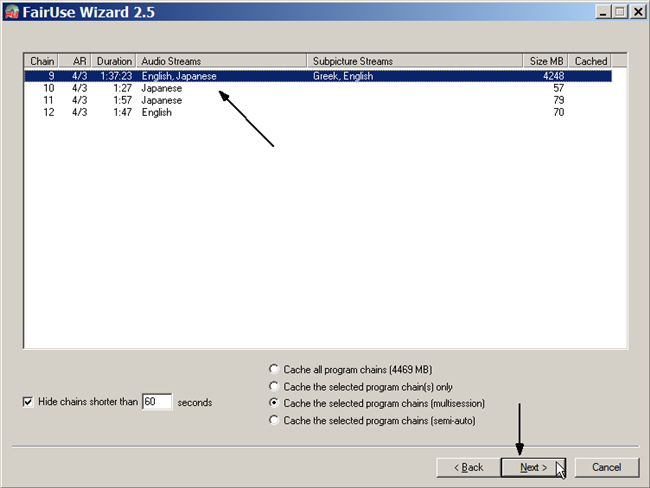
Here you can select which Chain (Title) you want to convert. Usually you want to convert the main movie which is the chain with the biggest Duration, so just select it and click Next.

Step4

Fairuse4

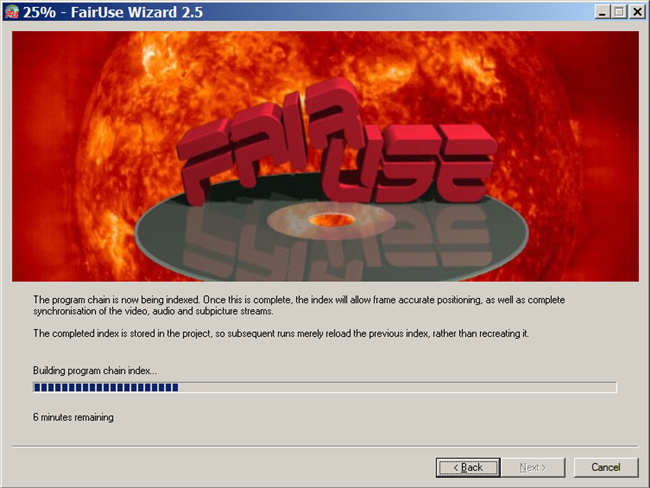
Now Fairuse Wizard rips the DVD and copies the index in your hard drive. This can take from 10 to 30 minutes depending on how big the movie is and how fast your DVD drive is. When its finished you will be forwarded to the next step.

Step5

Fairuse05

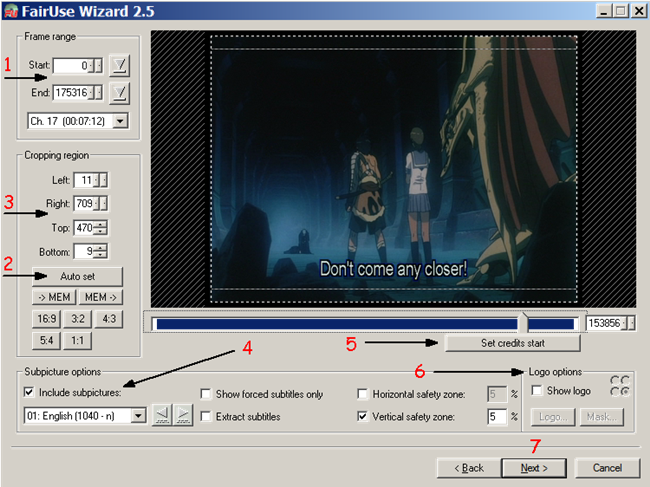
Here you can set most display and range settings. First of all you can select what range you the video you can to encode. Just move the slider under the preview to the points you want to start and end encoding and press the arrow both times (1). By default the whole movie is selected. Next you should set the area to be encoded so that you remove any black bars and maximize quality. To do that, click Auto set (2) and then made any adjustments necessary from the rest controls (3). You can see the video you have selected in the preview window (it's the big square) to make sure everything is fine.
Lets move on at the subtitle settings (4). First of all, if you want to include subtitles select Include subpictures and choose the language you want underneath. You can also set a Vertical safety zone to make sure that subtitles won't go too low which can cause them not to display well. You can preview the subtitles in the preview screen as well! Lets explain the rest of the options quickly as well. Show forced subtitles only will display only the subtitles that appear in a DVD even if you have them off, for example translation of signs in foreign language etc. Extract subtitles will save the subtitles in an external .srt file instead of embedding them in the video while Horizontal safety zone is pretty obvious that is the same thing with the vertical one but for the other dimension!
Just before we click next lets have a look at the Logo options (6). Here you can select a logo that you want to be included in the video easily, by enabling Show logo clicking Logo and select the image file. By the four buttons next to Show logo you can select the corner that it will appear.
When you are ready to move on click Next (7).

Step6

Step6a

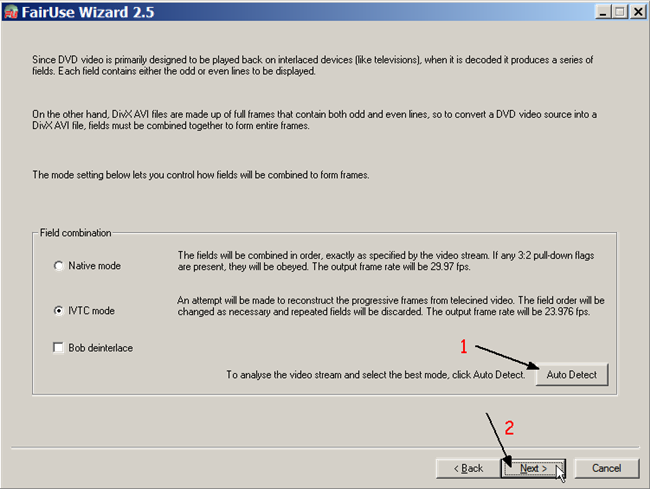
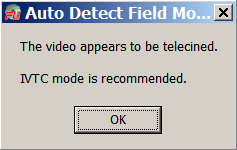
Here all you have to do is click Auto Detect (1) and FU will select the best setting for you as shown at the screenshot below. Click Next (2) and go to the next step.
Step06b

Step7

Step7


Here we have the video settings. First of all you can select the video codec (1). XviD and H264 come with Fairuse, to enable the rest of them you need to install the codecs that are grayed out. For most users XviD is the best choice so we will select it here. Next you can select the preferred size of the output file and select whether to do 2 passes or not (2). I really suggest you enable it, as although it takes a lot of time, it also improves the quality greatly.
Next come the encoding settings (3). The options are: Encoding speed, where you set the bar below depending on if you want better quality or faster encoding, Encoding Speed ESS, which is the same thing but sets the right settings for optimum standalone XviD/DivX players support, iPod Video, which automatically sets the right settings for encoding the video for your iPod and finally, Codec settings that allows you to set codec options manually.
Following the video settings come the audio ones (4). Here you can add/remove audio streams to your output file (you can add up to 2 audio streams). In the left area you see the streams you have added and in the right area you can select the sound codec (Mp3 or AAC) and the bitrate. Unless you want 5.1 audio, Mp3 at 128kbps should be fine.
Following up you can set the resolution you want (5). The default size should be fine, if you plan to playback the video in your TV you may as well select Use TV display mode. In the Files settings (6) right next to it you can set the segments you want to split the file to (for example if you select 1300MB output file and 2 segments it will create 2 files of about 650MB each). Defer processing (7) will put the project in a queue and let you start a new one to process all of them in the end. When you are done click Next (8) to move on.

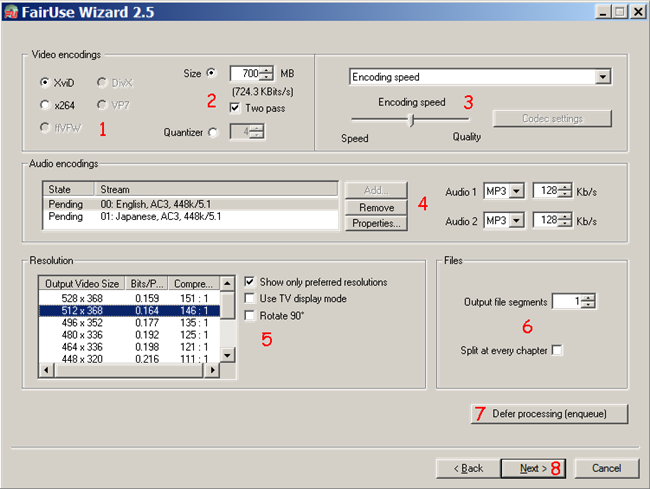
You can read our FAQ for H.264 and decide yourself whether to use it instead of XviD or not. You can read the FAQ here.


Step8

Fairuse8

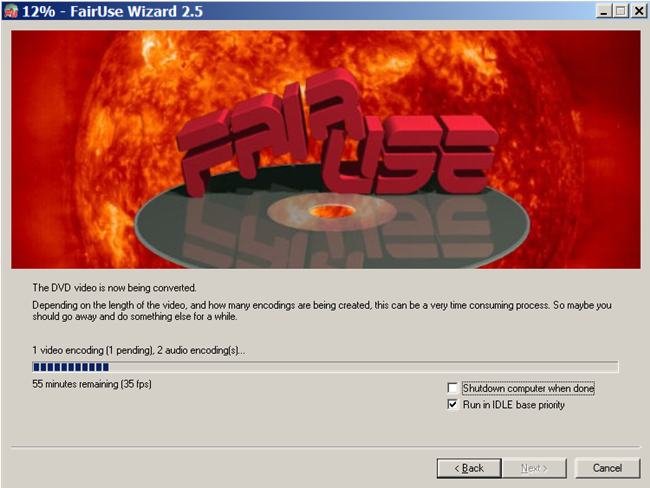
Now Fairuse Wizard will begin the encodings. Depending on the speed of your PC and how long the movie is, this can take up to 10 hours so you may find handy the option to Shutdown the computer when done.

Step9

Fairuse10


That it! Your video is ready!

If you need help there is no better place than the Official Fairuse Forums which are hosted in our site.

Comments  

#42 BD 2011-09-21 18:01
This is a really easy program to use. I was able to rip my yoga video and edit it using Windows Live Movie Editor and got exactly what I needed from the DVD without having to have the whole thing. It worked perfectly. Now I can go on vacation without having to take DVDs with me.
-4 #41 luxo 2010-06-19 18:03
dogman514 might have a sloooowwwww PC!

I do like many others here, and use DVD shrink to rip DVDs to ISOs or convert video_ts folders to ISOs (takes about 5 minutes on my Vostro 1500, Core 2 Duo T7250, 2Ghz) then use FairUse Wizard to convert those ISOs to .avi with subs, which generally takes about 30 minutes.

If it's taking anyone longer than that, I'd recommend upgrading your shit :-)
+2 #40 LifetimeUpgrades.com 2010-05-15 06:11
Re: ...
written by jinkoryu, October 28, 2007

can the output resolution be set to 720x480?
Even though my source video capture area I can set to 720x480, when the screen to set output resolution comes up I can only choose 720x385 or something like that...

Has anyone came up with a solution to the above question. Sometimes the recommended settings squeeze the video vertically.
#39 Intrepidone 2010-03-19 05:56
Probably the best and fastest encoder I have used, and on my laptop. I have a Core 2 Duo T7800 2.6GHz and it takes approx 1 1/2 hrs for a 2 hr movie using 2 passes. I have tried Handbrake, MeGUI and AutoGK, they all take 4 to 6 hrs, I really don't understand why. If I use my Duo Core 3.6GHz computer with 4GHz RAM it takes about 4 hrs with FairUse. There must be some reason why my T7800 smokes using FiarUse
#38 johngou44 2010-03-17 09:29
to get the best quality u need to go into the detailed settings...
#37 johngou 2010-03-17 09:24
it takes about 1 1/2 hours on a 1.8 system with codec specified settings to convert a 2 hours 16 min movie .. i say this is th efastes encoder out there. sweet
#36 dogman514 2010-03-11 21:53
fairuse is alright if time is no object,i converted a dvd to avi with fairuse it took a little over 21 hours that a lot of time, the program is VERY SLOW,to compare i did the same conversion using AVS Video converter,AVS took only 4 hours and 17 minutes,big difference,i used two other converters one took 9hrs and 52 min.and the last one took 7 hrs 18 min.Fairuse has got to speed up the process otherwise this one is headed for the recycle bin.
+1 #35 Lifetime Upgrades 2010-03-11 19:03
I have downloaded this software and after a couple of conversions, I had to purchase it. I didn't necessarily need the unlimited version but when someone has a great product I want to reward them and besides for lifetime upgrades after purchasing it was a bargain.

Thank you so much and continue the great work. Just wish there was an option to save as an ISO file.
-1 #34 Kitaro 2010-01-28 14:09
I have a DVD with a wide animation. At crop settings i select 16:9 and i see a rectangle inside the movie frame cutting left and right bars from the main frame. This is ok. When i want to select the Output video size, resolutions from there don't match with my crop settings, and the final movie is too wide, and playing on my LCD it showed with black bars up and down so is not 16:9. Why the movie is not encoded at resolution from crop settings?
#33 mikeyy 2009-09-29 16:16
Nice guide, nice and easy to use program.

Latest Comments

  • nagendra
    i want no how download mango videos form youtube plz tell me boss nagendra1566@gmail.com
     
  • Docs
    AnyDVD is too expensive, I use MakeMKV to 1:1 copy to MKV, then use handbrake convert mkv, totally ...
     
  • DTS
    Thank you very much, I have never found the OST of ''The Warrior's Way'' movie and now I have al ...
×
We use cookies to personalise content and ads, to provide social media features and to analyse our traffic. We also share information about your use of our site with our social media, advertising and analytics partners.